Downgrade iOS 4 iPhone 3GS, 3G and iPod touch to 3.1.3 / 3.1.2 - Full Guide

Here's the full guide on how to Downgrade iOS 4 iPhone 3GS, 3G and iPod touch to version 3.1.3 / 3.1.2
Maybe you upgrading to iOS 4 and been slowed down your mobile device and that you want to go back to iPhone 3.1.3 / 3.1.2. Or if you are one of those iPhone 3GS (new bootrom) or iPod touch 3G / 2G (MC model) user who has upgraded to iOS 4 only to find out that you cant jailbreak it can follow the instructions posted below to downgrade iOS 4.0 to iOS (formerly iPhone 3.1.3 or 3.1.2).

Step 1: Download the old iPhone OS 3.1.3, iPhone OS 3.1.2 ipsw firmware files.
Step 2: Put your device into DFU mode (not recovery mode).
  • Connect your iPhone to your computer.
  • Turn iPhone off.
  • Start iTunes.
  • Hold Power and Home buttons together for 10 seconds or so.
  • Release Power button but keep holding the Home button until your computer recognizes a new USB device.
  • iTunes will now recognize your iPhone.
Note: Your iPhone screen at this time should be blank (black in color), if not, then you are most likely in Recovery Mode, not DFU mode.
Step 3 is for iPhone 3GS users only.

If you are on iPhone 3G or iPod touch 2G (non-MC model), skip Step 3 and continue from Step 4)


Step 3: This step is applicable to iPhone 3GS, iPod touch 3G and iPod touch 2G (MC model) which have their SHSH blobs (ECID SHSH) saved on Cydia for the firmware you downgrading on. If you don’t have your SHSH files saved, you cannot downgrade the mentioned devices.
So what we will do is to trick iTunes into thinking that it is watching Apple servers, while in real, we are going to change the address to Saurik’s server.


Step 4:
Navigate to C:\Windows\System32\drivers\etc\ and locate “hosts” file.
Step 5:


Mac users can get to “/etc/” directory by going through “Go –> Go to Folder” from Finder.


Step 6:
  • Open this “hosts” file in Notepad (for Windows) or TextEdit (for Mac OS X) and add this
74.208.105.171 gs.apple.com
line as shown in the screenshot below:


NOTE :

for Windows 7 and Vista: Start “Notepad” with Administrator privileges by right clicking on “Notepad” app, and click on “Run as Administrator“ option.
Step 7:
You will now have to restoreyour iPhone or iPod touch to the firmware you downloaded in Step 1. Click on your phone icon from the sidebar in iTunes. Now press and hold left “alt” (option) button on Mac (Left “Shift” button on Windows) on the keyboard and then click on “Restore” (Not “Update” or “Check for Update”) button in the iTunes and then release this button.


This will make iTunes prompt you to select the location for your downloaded firmware file. Select that ipsw file and click on “Open”.


Step 8:
Now sit back and enjoy as iTunes does the rest for you. This will involve a series of automated steps. Be patient at this stage and don’t do anything silly. Just wait while iTunes installs firmware on your iPhone or iPod touch. Your iPhone screen at this point will be showing a progress bar indicating installation progress. Now at some point, iTunes will throw 1011, 1013 or 1015 Errors see our posted here how to fix them. This is normal, just ignore this error as the firmware has already been successfully installed on the device.


Step 9:
Now you will need to exit your device from Recovery Mode. To do this, download a program called RecBoot (Windows / Mac). Run it and the click on “Exit Recovery Mode” button. Your device will now restart normally.

Here's the Video,..

iPhone 4 Gyroscope - Teardown to the Silicon

Apple first announced the iPhone 4's gyroscope at WWDC 2010, but it was largely overshadowed by other big players inside the phone -- the A4 processor, Retina display, and external antennas. A lot of technology gets stuffed into vibrational gyroscopes (the type found in the iPhone 4), yet a casual observer may barely notice the chip itself, let alone the phenomenal contents within it. iFixit and Chipworks have partnered to show you exactly what's inside these little gems:

According to Wikipedia's definition, "A gyroscope is a device for measuring or maintaining orientation, based on the principles of conservation of angular momentum." The key phrase is measuring or maintaining orientation, which is the exact reason an iPhone 4 contains one of these gizmos.

http://s1.guide-images.ifixit.net/igi/nmNv4u3uHqZ5VNIR.medium

http://s1.guide-images.ifixit.net/igi/Kdc5PWTBIIx3vvXn.medium

http://www.ifixit.com/Teardown/iPhone-4-Gyroscope-Teardown/3156/1

http://www.chipworks.com/iPhone-4-teardown.aspx 

Apple iPhone 4 Disassemble Instruction Guide

The phone uses the 1 GHz ARM Cortex A8 core, much like its bigger sibling, the iPad.

 * Unlike the iPhone 3GS and iPad -- which are both equipped with 256 MB of RAM -- the iPhone 4 has a whopping 512 MB.

 * The AGD1 is the new 3 axis gyroscope that we believe is designed and manufactured by ST Micro for Apple. The package marks on this device do not appear to be the currently available commercial part, L3G4200D.

 * In what can only be described as a work of genius, Apple has integrated the UMTS, GSM, GPS, Wi-Fi, and Bluetooth antennas into the stainless steel inner frame.

* Broadcom provides both a BCM4329FKUBG 802.11n with Bluetooth 2.1 + EDR and FM receiver and a BCM4750IUB8 single-chip GPS receiver.
* We've identified chips from Broadcom, Cirrus Logic, Numonyx, Samsung, ST Micro, Skyworks, Texas Instruments, and TriQuint.

Here's a teardown with analysis from ifixit.

http://s1.guide-images.ifixit.net/igi/kUEKB6Y2Ah5OIfAh.medium
The teardown:
http://www.ifixit.com/Teardown/iPhone-4-Teardown/3130/1


iPhone 4 all torn down:
http://s1.guide-images.ifixit.net/igi/kUEKB6Y2Ah5OIfAh.huge

Disconnecting logic board connectors:
http://s2.guide-images.ifixit.net/igi/AhMYpVQZs4HfRJaG.huge

Taking out the camera:
http://s1.guide-images.ifixit.net/igi/YJLZ65WWLGtCugsU.huge

Removing the logic board:
http://s1.guide-images.ifixit.net/igi/4LvvhPsqKcwvkRE5.huge

Separating display from frame:
http://s2.guide-images.ifixit.net/igi/iDQNYymGn3MyxCRR.huge

steps to remove samsung I780 Security (Phone) Code Locked

If you have in hand a samsung i780 security (phone) code locked, but the problem is that you cannot hard reset from setting menu because you  cannot enter its main menu at all, because of phone code blocking through it.
How to remove phone code on samsung I780? hard reset will not work.Here's the solution for that, All you need to do is to flash the phone to its original language ROM, but make sure that you recognize its original language ROM, but you can upload any ROM you want, it doesn't matter which rom or what version.
Bricking the device is possible (rare but possible) but it's the only chance you have to remove that code. You can easily find language ROM on the internet by searching.

Now here's the  flashing guide  for Samsung SGH-i780

PDF File:

http://rapidshare.com/files/22818959...hing_Guide.pdf

Files Needed:
1. Samsung USB Driver:
http://rapidshare.com/files/22819049..._WHQL_v3.4.exe

2. Russian ROMS:
http://www.4shared.com/file/63104055...HE1_Rev12.html

3. E1 English PDA ROM:
http://rapidshare.com/files/13151206...DXHE1.rar.html

4. Mirage Updater:
http://rapidshare.com/files/22819176...ge_LV_v1.8.exe

Tried and tested best result by flashing it using Windows XP OS.

SPRINT 7700 Harware Repair Solution in executable software

Sprint 7700 Repair Solution, this software pack with repair guides to the following failures and problem on sprints 7700: low battery repair solution, LED key light problem failure, handsfree repair, LCD screen display failure repair, no service, SIM problem and failure repair and also includes the pinouts layout guide.

http://img265.imageshack.us/img265/3816/imagepws.jpgcreated by Mr. Sujan,
Downloads : SPRINT 7700 ALL SOLUTION EXE

Procedures on How to Unlock Htc Tattoo, Htc Hero & Other Branded Orange UK

Here's a procedures on How  to Unlock Htc Tattoo, Htc Hero & Other Branded Orange UK. If ever encountered with an Htc Tattoo unlocking with code and enter it  and shows ok but continue to says unlocking sim card and nothing can't enter in network and if being  turned off and on it ask again the unlock code.
This unlocking solution covers for  Htc Tattoo, Htc Hero and other branded Orange with Android OS.


Download the 'ROM' Update for your HTC phone.

The 'ROM' can be downloaded from official website of HTC.com/uk/

Or from below link.

ROM for HTC Tattoo

ROM for HTC Hero

Install HTC Sync

Download

Now Run Rom upgrade utility, and wait till setup finished.


then put non accepted sim card. Enter the code.

Can I earn without any having complete tools yet in mobile phone repair?

I just want to post this simple answers here of some new learners that keep asking me, on how to start earning from repair without any having complete repair tools yet at all.
Some beginners might think that fixing a defective phone might as well as too difficult to deal with.
So this is just a quick and simple answer for the above question.

Well, all I can say is that you can start from the scratch, there are so  many mobile phone technicians started from nothing and turned into something, I've been also started from scratch, way back 9 years ago, I repaired cell phones before that only an opening tools like T6 screwdriver and a tweezer on my working table.


Mission Repair

In cell phone repair, there are two types of failure to handle with;
The software and the hardware related problem or failure issues.
Its not been a bit easy to determine which type of failure to deal with a faulty mobile phone indication, that is why many expert uses the method of checking its firmware first before considering that the problem lies on the hardware parts.
this method is by way of reading the mobile phones firmware by a way of using flashing or unlocking tools, then in by this method they can read the logs. This logs is firmware that composed of many codes, the logs can help to determine which part or components causes the problem.

Some software problem related failure issues are of such the following indications, but also the failure lies on the hardware parts in mobile phone devices, like hang up on logo only, often restarted, contact service, contact retailer, contact service provider etc, unable to power up, or dead phone due to its firmware interruption and a lot more which can only explained by after check up process.

For a beginners, these are the things you can do repair as a good way to start.
Well, you can do repair by replacing broken LCD's, replacing a broken power ON/OFF switch, you can do repair minor problems such us ringer problem, not charging, mouthpiece microphone, earpiece speaker problems and more problems that is not necessarily needs a deep troubleshooting procedure.
You can do that as well as it doesn't need any software tools to handle with.
All you need is replacement spare parts, a guide on how to dismantle the handset and or a service manuals.

What about flashing and unlocking?
Flashing and unlocking is not hard and too difficult to deal with, it is because when you purchase a flashing or unlocking tools, the sellers or the resellers will provide a support for their product via online. I have a little bit guide on this blog but not too much, due to some blogging restrictions.
The sellers  will update and inform you from time to time which and what mobile phone handsets is newly supported and will work with.You can visit this forum for where they all hanged out.
The techniques in flashing and unlocking is that you have to be familiar with the software tools and also by reading of the logs and codes.

Cell Phone Power ON/OFF switch line paths, Basic test procedure

If you ever wonder how to determine if the power on off switch line paths is working or not or being cut or open, when proceeding to repair a dead cell phone handset?
This one will help you to a more specific troubleshooting steps,
before looking for or applying a power ON OFF ways solution  or modified jumper on it.

This tricks can be applied before or after doing the following steps in repair procedures,
1. the flash firmware is okay
2. the power switch is okay
3. the phone can charge up or accept and show charging indication on LCD display  but won't power up

Here's a simple Tricks on how to determine faulty power ON/OFF switch line path on mobile phone's circuit.

By a way of Checking Resistance: This one can be applied if the power on/off line is directly connected to the Power Management IC terminal itself and no other components or open tests spot on the PCB's layout.
Set your multimeter tester to X10 or X 100 and connect the one probes to the power line path terminal of the power on off switch and the other one to the ground. Do this twice by reversing both probes position. If there is an indication of reading it means that line paths is okay, but without any response from the multimeter tester this means that the power on off switch line path is being cut or open. This technique is not just considering that every components needs a connection to the ground to work but definitely  it won't work exactly without the ground connection.

By a way of checking voltage: This method can be applied by using a temporary voltage from DC Power Supply Regulator  or even a battery itself, if the said handset is manageable to attach the battery without the pcb casing on it.  Some mobile phones can be attachable when the battery pin connector is mounted and soldered on the PCB and unlike those have not.

Okay by checking voltage, just set the multimeter tester to 10volts DC, connect the negative probe to the PCB's groundings,  then the other other one which is positive to the power on off line path. The voltage reading can reach up to 1 to 4 volts DC depending on which particular mobile phones models. The most important part on this, is that you should get readings to determine if the line paths is okay. Without any reading, the line path is seemingly open or cut.

Power ON OFF Switch on Mobile Phone - Test and Check Up Procedures

ON/OFF Switch on cell phones comes different  varieties and forms or designs but the fundamentals on how does it work or where to use it is the same. On Off switch can be determine by the number of its legs or terminals.
This cell phone repair tutorial for beginners covers on how to check the power on off switch on mobile phones and also work on  volume key switches. 

Here's a brief information on every ON and OFF switch which covers how the components being assembled and by this information you can easily test and check up the said switch if it is good or in working condition.
By checking on off switch is been so simply by just only checking its terminals conducting continuity.
A broken power on off switch can be easily determine when its visual assembly is busted out,
so this procedure below covers only when the said switch visual assembly seems to be good.

This also the first step to repair the mobile phone if unable to power up, its like happens when the phone can accept and show charging if at charging state but unable to power up while pressing the power ON OFF button switch.

The two Legs On OFF switch assembly:
This check up procedure can work even if the ON OFF switch is mounted on the printed circuit board or isolated.
Two check this two legged kind of ON OFF switch is  by simply set the multimeter to X1, then connect the two test probes of the multimeter to both legs of the switch, we are  just simply trying to check here if the on off switch continuity. Then hold it so that it won't move then simply press it gently. You can easily determine it here when the said switch is working or not by the multimeter response, If the pointer moves approximately 0ohms the switch is good and working, but while if it is not moving at all it means the switch is faulty.

The four legs ON OFF switch assembly:

This check up procedure can work even if the ON OFF switch is mounted on the printed circuit board or isolated.
Four legged On off switch has its both opposite two terminal connected which other, so by checking this said switch is similar to the two legged on off switch. Again. just set the multimeter to X1 and connect the both probes to both opposite terminal of the said switch then simply hold and gently press it to get readings.
If the the multimeter's pointer moves it means  it is working while if not the switch is faulty.

Read here for  understanding how ON OFF switch works for advance power ON OFF switch problem repair troubleshooting techniques.

HTC Touch 3G T3232 Hard Reset Instruction Guide

If you have an HTC Touch 3G T3232 and password was enabled, by doing hard reset can remove the password and this will also return it to its factory settings again. 
Here's,  how to hard reset the HTC Touch 3G T3232 with step by step instructions.
Note: Please back up all of your personal data before proceeding, all data will be deleted on the Motorola BACKFLIP as a result of this process. However, this procedure does NOT delete data stored on the microSD memory card. .
Here's the procedure:
1. Pull out the stylus.
2. With the device turned on, press and hold the VOLUME DOWN and ENTER buttons "aka the center button" , then press the RESET button with the stylus tip.
3. Release the RESET button, but continue pressing the VOLUME DOWN and ENTER buttons until you see this message on the screen:

This operation will delete all your personal data and reset all settings to manufacturer default. Press Volume Up to reset to manufacturer default, or press other keys to cancel.

4. Release the VOLUME DOWN and ENTER buttons, then press the VOLUME UP button to perform the hard reset, or press any other button to cancel the reset.

5. After restore completed press VOLUME UP again to restart the device.

Search Results


Motorola BACKFLIP Hard Reset Instruction Guide

If you want to return it to its factory settings again. Here's,  how to hard reset the Motorola BACKFLIP with step by step instructions.

Note: Please back up all of your personal data before proceeding, all data will be deleted on the Motorola BACKFLIP as a result of this process. However, this procedure does NOT delete data stored on the microSD memory card. .
Here's the procedure:

1. Turn the power off. If your Motorola BACKFLIP is frozen, pull the battery out and reinsert it
   2. Press and hold the Power and Camera buttons
   3. Release the Camera button when prompted
   4. Press and hold the Volume Down key
   5. A yellow exclamation will appear on the display
   6. Select the Wipe data/factory reset (Alt + W) option

All data including third-party applications will be deleted from the Motorola BACKFLIP
Once the wipe is complete, the phone will reboot and return to to its factory default state settings.

HTC DROID Incredible Hard Reset Instruction Guide

If you ever wonder  how to hard  reset the HTC DROID Incredible? Here's how with step by step instructions. Note: Please back up all of your personal data before proceeding, all data will be deleted on the HTC DROID Incredible as a result of this process. However, this procedure does NOT delete data stored on the microSD memory card. .
Here's the procedure:

 1. Turn the power off. If your HTC DROID Incredible is frozen, pull the battery out and reinsert it
   2. Hold the Volume Down button
   3. Hold the Power button until the display turns on
   4. You are now presented with a menu that allows for Fastbook, Recovery, Clear Storage, and Simlock
   5. Select Clear Storage by pressing the Volume Down button
   6. Press and release the Power button to select
   7. Now simply confirm your decision: Volume Up for YES and Volume Down for NO

If Yes is selected, all data including third-party applications will be deleted from the HTC DROID Incredible. If the wipe is complete, the phone will reboot to its factory default state settings.

HTC EVO 4G hard reset instruction

Wondering how to hard  reset the HTC EVO 4G? Here's how with step by step instructions.

Note: Please back up all of your personal data before proceeding, all data will be deleted on the HTC EVO 4G as a result of this process. However, this procedure does NOT delete data stored on the microSD memory card. .


Here's the procedure:
   1. Turn the power off. If your HTC EVO 4G is frozen, pull the battery out and reinsert it
   2. Hold the Volume Down button
   3. Press and release the Power button
   4. You are now presented with a menu that allows for Fastbook, Recovery, Clear Storage, and Simlock
   5. Select Clear Storage by pressing the Volume Down button
   6. Press and release the Power button
   7. Upon confirmation: Volume Up for YES and Volume Down for NO

If YES is selected all data including third-party applications will be deleted from the HTC EVO 4G.
Once the wipe is complete, the phone will reboot and return to to its factory default state settings.

HTC HD2 Soft Reset and Hard Reset Instruction Guide

Sometimes things can go wrong on your HTC HD2 and you may need to perform a hard reset or also known as factory reset.
If your HTC HD2 is frozen and a soft reset doesn't work, this guide will help how to restore your handset to its factory settings with a soft reset or hard reset.


If your HTC HD2 has frozen, or you just want to clear all of your personal details from the device, you'll need to perform a hard reset.

Please note: You will lose any saves data on your device, so be advice to try a soft reset first.

There are two ways you can perform a hard reset on your HTC HD2. The first is best if your phone is still operational. If it has crashed and you can't get a response from it, you're better to try option two.

Performing a factory reset through the settings menu

1. On the Home screen's Settings tab, select Menu - All Settings - System - Clear Storage
2. Enter 1234 and tap Yes to confirm

Performing a factory reset using the phone's buttons

1. If your phone has crashed and won't respond, you'll have to perform a battery pull to power the phone off. Simply take off the back cover and remove the battery. Otherwise, just turn your HTC HD2 off using the power button.
2. With your phone powered off, press and hold the volume up and volume down buttons
3. While holding the volume buttons, press the power button and then release it
4. When you see a warning message on screen, release the volume up and volume down buttons
5. Press the volume up button to perform the reset when prompted, or press any other button to cancel the reset.

Verizon Wireless HTC Imagio Hard Reset

This is how to hard reset the Verizon Wireless HTC Imagio so you can restore it to factory-fresh goodness. This mobile phone released last December 2009 and Packed with Microsoft Windows Mobile 6.5 Professional OS, but resetting HTC Imagio is quite different from other HTC mobile phone. Just follow this simple steps below.
Please Take Note: This process will completely erase any data and all settings on your device. We highly recommend that you backup your data and make note of your settings before beginning this process.


Here' the procedure:
1. Tap Start
2. Tap on Settings
3. Tap on All Settings
4. Tap on the System tab
5. Select Clear Storage

The data and settings on you HTC Imagio will now then reset to factory defaults and the phone will reboot to complete the process.

HTC myTouch 3G Slide Hard Reset Instruction Guides

A Microsoft Windows Mobile 6.1 Professional Featured HTC myTouch 3G Slide Hard Reset Step by step Procedures. I have done this many times and so very simple and easy, so I know you can do it too.
Note: The result of this process will delete all data stored on your HTC myTouch 3G Slide, So please back up a copy of it before doing this Hard Reset Steps below. However, this will NOT delete all data that being stored on the micro SD card memory.

Here's the Procedures:
 1. Turn the power off. If your HTC myTouch 3G Slide is frozen,   pull the battery out and reinsert it
   2. Hold the Volume Down button
   3. Press and release the Power button
   4. You are now presented with a menu that allows for Fastbook,  Recovery, Clear Storage, and Simlock
   5. Select Clear Storage by pressing the Volume Down button
   6. Press and release the Power button
   7. For confirmation: Volume Up for YES and Volume Down for    NO

If YES is selected, all data including third-party applications will be deleted from the HTC myTouch 3G Slide. Once the wipe is complete, the phone will reboot to its factory fresh state.

Samsung I9000 Galaxy S Hard Reset

Note:  Please back up all of your personal data before you proceed. All data will be deleted on your Samsung I9000 Galaxy S by doing this procedure. However, this process will NOT delete data stored on the microSD memory card.
To Hard Reset Samsung I9000 Galaxy S
 1. Turn the power off. If your Samsung Galaxy S is frozen, pull the battery out and reinsert it
   2. Hold the Volume Down button
   3. Press and release the Power button
   4. You are now presented with a menu that allows for Fastbook, Recovery, Clear Storage, and Simlock
   5. Select Clear Storage by pressing the Volume Down button
   6. Press and release the Power button
   7. Now simply confirm your decision: Volume Up for YES and Volume Down for NO

If the above procedures doesn't work, use this second method below,
1. Shut Down Samsung I9000 Galaxy S
2. Now press the Volume up, Home and Power button together.
3. When Samsung Symbol shows up release the power.
4. Then there is a boot Menu. Use the volume up/down to choose and home to select.
If  YES is selected, all data including third-party applications will be deleted from your Samsung I9000 Galaxy S. Once the wipe is complete, the phone will reboot to its factory fresh state.

HTC Aria Hard Reset

Note:  Please back up all of your personal data before you proceed. All data will be deleted on your HTC Aria by doing this procedure. However, this process will NOT delete data stored on the microSD card.

1. Turn the power off. If your HTC Aria is frozen, pull the battery out and reinsert it
2. Hold the Volume Down button
3. Hold the Power button until the display turns on
4. You are now presented with a menu that allows for Fastbook, Recovery, Clear Storage, and Simlock
5. Select Clear Storage by pressing the Volume Down button
6. Press and release the Power button to select
7. Confirm: Volume Up for YES and Volume Down for NO
Once the wipe is complete, the HTC Aria will reboot to its factory fresh state.

Motorola FlipOut Hard Reset

Note:  Back up all of your personal data before you proceed. All data will be deleted on your Motorola FlipOut by doing this procedure. However, this process will NOT delete data stored on the microSD card.
To Hard Reset Motorola FlipOut.
1. Turn the power off. If your Motorola FLIPOUT is frozen, pull the battery out and reinsert it
2. Press and hold the Power and Camera buttons
3. Release the Camera button when prompted
4. Press and hold the Volume Down key
5. A yellow exclamation will appear on the display
6. Select the Wipe data/factory reset (Alt + W) option
If you selected YES, all data including third-party applications will be deleted .
Once the wipe is complete, the phone will reboot to its factory fresh state.
Done, your Motorola FlipOut Reset back from its original status.

Samsung i897 Captivate Hard Reset Procedure

Note:  Please back up all of your personal data before you proceed. All data will be deleted on your Samsung i897 Captivate by doing this procedure. However, this process will NOT delete data stored on the microSD memory card.


To Hard Reset Samsung i897 Captivate

   1. Turn the power off. If your Samsung Captivate is frozen, pull the battery out and reinsert it
   2. Hold the Volume Down button
   3. Press and release the Power button
   4. You are now presented with a menu that allows for Fastbook, Recovery, Clear Storage, and Simlock
   5. Select Clear Storage by pressing the Volume Down button
   6. Press and release the Power button
   7. Confirm, Volume Up for YES and Volume Down for NO

If the above procedures doesn't work, use this second method below,
1. Shut Down the Samsung i897 Captivate
2. Now press the Volume up, Home and Power button together.
3. When Samsung Symbol shows up release the power.
4. Then there is a boot Menu. Use the volume up/down to choose and home to select.

Once the wipe is complete, the phone will reboot to its factory fresh state.

5800 Xpressmusic LCD Screen Display Problem Repair Procedure

 Step by step repair procedure on Nokia 5800 Xpressmusic mobile phone LCD screen display problem.
This mobile phone repair tutorial, only applicable if after replacing a good LCD replacement or rest assured that the LCD screen is working fine but the display problem still exists.

The repair guide picture below is the location of the 5000 xpressmusic's LCD connector and a an EMI filter IC near to it.
If the LCD connector is seemingly okay and the quickest method is to replace the EMI Filter IC which has a product code value of EMIF07-LCD02F3 . In this IC where the four data signals feeds across from the Application processor through the LCD screen circuit.

5800 Xpressmusic display problem repair guide
But after replacing it  and nothing happens and the problem remains, here's a simple hints for beginners on LCD repair  procedures, this one can be applied in any mobile phone repairs, and this one can save time, rather than rushing through.
Analyze the circuit and understand how the LCD circuit works and use schematic diagram to be familiar with its components locations.
5800 Xpressmusic display IC

This next repair guide picture that i prepared below is the tracing and test spots on 5800 xpressmusic LCD connector and components, a good way to start on checking up and test on that spots there.
5800Xpressmusic LCD connector pinconnection
Those two line coils connected to pin 10 and pin 12 are the LCD's supply voltage. You may check it first if it has a continuity, if found open, replace it.  The four test spots on the PCB board is connected from the EMI filter bumps or terminal through to each corresponding LCD connector pin numbers, trace and check it also. If found open, you may apply a tiny jumper unto it.

Voltage line checking is also a powerful technique of advance hardware troubleshooter on cell phone repair.
You may apply voltage to the handset and power it up and measure the voltage line paths as shown on the example repair guide picture below.

LCD screen display used two types of different amount of voltage from the power management IC, to make it work. One is called "VAUX" that is approximately 2.8volts DC and the other one is "Vio" that is about 1.8 volts DC.
If all the above repair procedure is have been done and seemingly not solve the problem, you may replace the EMI filter or you may  use this repair guide picture below.
The EMI filter bumps configuration is shown right, the bumps that are connected is where the LCD data signal flows, the remaining bumps are all connected to PCB ground lines.

Repair Guide on Nokia 5800 XpressMusic Touchscreen Control Circuit

These are the tracing line paths on how to repair a faulty touchscreen navigation issues.To repair touchscreen problem issues needs just little bit analysis unlike any mobile phone repairs procedures. You may proceed in this free tutorial and apply this repair  guide if you already do the following method like hard reset, updating or flashing its firmware or by replacing  the touchscreen panel pads and make rest assured that the touchscreen replacement spare parts you've purchased is perfectly working and nothing happens or the problem still exists while doing so.

In Nokia 5800 xpressmusic the touchscreen connector lies within on the top side of the printed circuit board,
each X and Y axis have an open tracing spots located near to it.
The repair guide picture below shows the open test spots where a good way to start the check up procedure on that location, it is so easy to trace the line paths from the touchscreen connector since it so very near on  that point.  Just refer to the refer guide picture and trace each pin configuration where each corresponding X and Y axis is being connected.
5800 touchscreen connector ways
Now, after those parts already been test and calibrated and seems to be okay, you may now proceed to trace and work on the touchscreen control integrated circuit (IC), before removing it or replacing the said IC, check first if the supply voltage that feeds to it is working fine, you may first test the two resistors where the supply voltage line flows. those two resistor seems to be fusible for it has a low resistance value.
The resistance value is indicated on the repair guide picture below,  the resistors value is 10 ohms and the other one is 0 ohms. You may replace those resistors if found open or busted and you may also check the capacitor if it is open or shorted.
5800 Touchscreen Control IC voltage supply test spots
You may then now continue to trace the main supply voltage origin or location, the voltage supply origin is located near the power management IC. check if the voltage line paths is okay and then have a test on its voltage if present on that certain point. See the repair guide picture below.
Nokia-5800-Touchscreen-Control-IC-voltage-supply-ways

 Necessarily, proceed to this step, reheat or reflow the IC then check if it is working.
Remove the touchscreen control IC, and prepare for a replacement parts. But before doing so, while the touchscreen IC is out from the printed circuit board, trace the X and Y line paths from the test spots location near the connector pin way across to the touchscreen terminal or ball bumps. Just check if there are continuity of each line paths unto it. It is so easy to do that even if there is no any cell phone repair guide to follow , just trace each four lines if the connection is working fine. Apply a jumper magnetic wire if you can manage to do on that way. Replace the touchscreen control IC after all of those repair tutorial steps above seem all been done and all corresponding components is working well.
If this procedure will not solve the problem you find and used any mobile repair manual or guides like schematic diagram for deep troubleshooting analysis.

Repair Guide on Nokia 5800 XpressMusic Insert SIM Card Problem Issues

Here's a Repair Guide on Nokia 5800 XpressMusic Insert Sim Card Problem Issues. But before proceeding to this hints make sure that you already done the basic method on how to deal insert sim card related common problem. Just make sure that the pin connectors also been cleaned properly before doing this procedures below.

This simple steps  will help how to solve insert sim card problem issues on Nokia 5800 xpressmusic, but might also will not, if the trouble occurs deep within the PCB board line paths or the Integrated IC itself (Avilmas,power management IC)..

  The nokia 5800 xpressmusic sim card line paths is connected directly to power management IC, except for the power supply voltage line which is always have the open test  spots where we can check and test.
As I've already been discussed here that the simcard pins connection is composed of 6 connectors where:
SIM Data, SIM  Clock, SIM Reset, Supply Voltage and a Ground and the other pin is left unconnected.
The repair guide  picture below based on the circuit's Schematic Diagram, and the tracing line that only available for check up is the Vsim that supply power voltage to the sim card's Pin 3.


You can test the voltage started from C220 points that I highlighted color red, at that point you can measure approximately about 1.8volts up to 3volts DC voltage, then to C2700 just located near the SIM card connector, and then  to the Pin #3 of SIM card connector.

Repair Guide on Nokia 5800 XpressMusic Digi Mic Knopfler

Here's a hints on how to repair or fix Nokia 5800 XpressMusic Digi Mic Knopfler problem issues.
A guide picture below which I included an schematic diagram shows each every components and line paths for quick test and check up procedures.
Digi Mic Knopfler Pin configuration:
1. L/R - microphone's left and right audio signals groundings
2. CLK -  Audio Clock data
3. Data - Digital Microphone data
4. VDD - Power supply voltage
Locate and trace each and every components, line paths and corresponding connection as shown on  a picture. The red highlighted components and line paths is for the power supply voltage which came from Power management IC (AVILMAS) Vsim2- approximately 2-3 volts.
Test and check this components and track the supply voltage from C220 to C2170 then through the digi mic knopfler pin 4.

 The pink highlighted components and line paths is for Audio Clock data signal, which is came from the Audio Codec IC (Avilmas) then flow across R2201 and R2170 (valued 100ohms each) then to the Digi mic knopfler pin number 2. Check also the C2173 valued 22p Clock filter capacitor for possible damaged.
I included step by step procedures on the images  like as follows:
* Check each components and line paths.
* Replace if found open or shorted
* Jumper the line paths if found open or cut
* Check or replace the digi mic knopfler for a quickest step might as possible.

 The microphone's digital data signals has also a line paths connected to the front side of the Printed circuit board, check and trace also this line paths which is connected to digi mic knopfler's pin 4.

Digi Mic Knopfler on Nokia Cellphone Hardware's Circuit

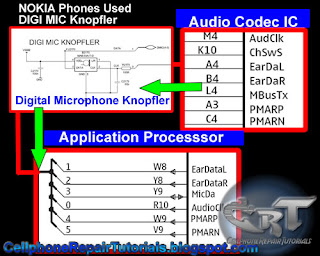
Digi Mic knopfler stands for Digital Microphone Knopfler, Knopfler is a brand name of a popular recording equipments like in microphones, guitars and more. A digi mic knopfler is the latest types of microphone that being used on nokia hardware components, It's a kind of tiny microphone that feeds audio data signal digitally, unlike the most common types which only feeds analog audio signals.

Here's a brief Explanation on How this circuits works for future references.
The picture below is a circuit of Nokia Audio signals from the Audio Codec Circuit( Power IC, Vilma,Avilmas,Retu) feeds to an Application Processor(CPU,Rapidoyawe,Rap3gs,etc.)
The Audio Codec Feeds back the following audio datas and signals:
*AudClk - Audio Clock
*Micdata -Microphone Data
*EarDaL -Earphone Data left channel
*EarDaR -Earphone Data Right channel
*PMARP -  Radio Audio Data Positive
*PMARN - Radio Audio Data Negative
Unlike other nokia cellphone handsets like, 5800 XpressMusic, E65, 6220c and more,. used a Digi Mic Knopfler ( like ie..MAB-03A-T-D),.. In between those line paths from the picture above were the digi mic knopfler is being connected. see pics below:
 From the Audio Codec IC the Audio Clock Signal  is being connected to the digi mic knopfler to generate another digital audio mic data.
In this process a good and high quality audio data signal is being produce, rather than a typical cellphone's microphone or mouthpiece.
Tutorials on how to test digi mic knopfler MAB-03A-T-D, I will add later.

Sony ericsson Xperia X10 mini, restart loop, logo hang problem solution

Sony Ericsson Xperia X10 mini, that just only showed the Sony Ericsson logo and often restarted...
This is cause by an interrupted  firmware, or software related problem issues.
Sony Ericsson Unlocked XPERIA X10 Mini E10 E10i GSM Android Cell Phone with 3G, 5 MP Camera, Wi-Fi, aGPS, Bluetooth, MicroSD - International Version with international Warranty (White and Silver)

1. Let the battery run flat
2. Download and install SEUS (Sony Ericsson Update Service) or other flasher like SEtool2
3. Connect it and flash it (It can easily be flashed as it charges with USB
cable)

It will take some time for the unit to start up normally after flash, like all other Sony Ericsson Handsets.

Motorola Flashfile Firmwares Download

Motorola ODM,Windows Mobile and P2K Flashfile Firmwares Download for the following Models:
c113, c115, c117, c118, c119, 139, c155, c168, c200, c205, c257, c261, c300, e365, t190, t191, v171, v177, w205, w218, w220, w375, mpx200, mpx220, c350, c350l, c380, c390, c450, c550, c650, e1, e398, k1, k3, l2, l6, l7, l7e, l9, t720, t720i, u6, u9, v3, v3i, v3x, v3r, v6, v8, v150, v180, v220, v300, v500, v600, v360, v535, v547, v635, w510, z3, z6
 
Firmware for Motorola ODM Models Types

Model Version Download Size File type Description
C113, C115 1.0.38 download 3.92 MB main+lp+flex+dmtool_v7.3.04.6
C117 3.1.67 download 3.52 MB main+lp+flex
C118 3.0.73 download 3.55 MB main+lp+flex+dmtool_v7.3.04.6
C119 3.0.73 download 3.68 MB main+lp+flex+dmtool_v7.3.04.6
C139 1.0.03 download 2.29 MB main+lp+flex+dmtool_v1.1.03
C155 0.3.44 download 6.22 MB main+lp+flex+dmtool_v1.0
C168 1.090 download 18.37 MB main+lp+flex+pc_redownload_v4.3.3
C200, C205 1.24 download 2.03 MB main+lp
C257 0.1.66 download 8.20 MB main+lp+flex+dmtool_v1.2.0.9
C261 0.1.66 download 8.08 MB main+lp+flex+dmtool_v1.2.0.9
C300 1.06 download 2.47 MB main+lp
E365 2.1.15 download 17.46 MB main+lp+flex+mme_v0.3.6
T190 5.88 download 1.65 MB main+lp+dmtool_v9.3.04.6
6.07zeus download 1.59 MB main+lp
T191 1.87 download 5.27 MB main+lp+dmtool_v3.15
V171 4.4.69 download 5.45 MB main+lp+flex+dmtool_v9.3.04.6
V177 0.1.66 download 8.08 MB main+lp+flex+dmtool_v1.2.09
W205 0.2.70 download 3.72 MB main+lp+flex+dmtool_v1.4.0.6
W218 0.5.77 download 4.28 MB main+lp+flex+dmtool_v1.4.0.6
W220 1.28 download 17.97 MB main+lp+flex+pc_redownload_v4.3.3
W375 0.0.80 download 9.10 MB main+lp+flex+dmtool_v1.2.1.15

Firmware for Motorola Windows Mobile Model Types

Model Version Download Size Description
MPX200 wm2003 download 20.45 MB firmware + software + manual firmware
MPX220 1.49 download 32.78 MB firmware + software + manual firmware

Firmware for Motorola P2K Model Types

Model Type Version Flex Version Download Language Package Size Description
С350 C350 09.04.74R SE6284AXXU1098 download 0011 7.87 MB reflash+flex
C350l R312ULS 09.10.82R SE7606AXXU1080 download 0011 4.85 MB reflash+flex
C380 R365 0B.D2.23R SE7693BXXU1114 download 002E 9.24 MB monsterpack
C390 R368 0B.A0.0FR SE8943AXXU101E download 002E 9.00 MB monsterpack
C450 R312ULSHA 09.10.29R SE7665AXXT1079 download 002B 5.28 MB reflash+flex
C550 R321 0A.10.24R SE8342AXXU408D download 0011 10.49 MB monsterpack
C650 R365 0B.D2.32R SE8402BXXU1113 download 002E 9.55 MB monsterpack
E1, E398 R373 0E.30.42R SE7007AXXU107A download 002E 15.01 MB monsterpack
E1000 R26LD 83.39.24I USE1000SAUFIR26007 download 002C 15.60 MB monsterpack
K1 R4527 08.02.81R GSTCNRYT677VW136 download 002D 26.20 MB monsterpack (sbf)
R452F 08.03.08R GSTCNRYRRTRU091 download 002E 19.53 MB monsterpack (sbf)
K3 R261171LD 99.41.04R USSUMBARTRUR261171018 download 0036 23.06 MB monsterpack (sbf)
L2 R3511 0A.53.15R SE5410AXXU2107 download 0051 12.16 MB monsterpack
L6 R3511 0A.52.26R SE5408AXXJ8098 download 000D 12.47 MB monsterpack
L7 R4513 08.B7.AER SE5743AXXU1118 download 002E 15.51 MB monsterpack
L7e R452D 08.01.0AR GSTHAWAIIRTRU06F download 002E 17.76 MB monsterpack (sbf)
L9 R452J 08.22.04R GSTHAWITRTRU086 download 002E 17.93 MB monsterpack
T720, T720i T720PM 05.41.65R SE4187AXXU1126 download 0011 5.71 MB reflash+flex
U6 R478 08.84.2DR SE8281AXXU1156 download 002E 14.50 MB monsterpack
U9 R6632 81.11.29R GSJPICORTRU052 download 0031 63.56 MB monsterpack (sbf)
V3 R374 0E.41.C3R SE8602AXXU10C3 download 002E 13.43 MB monsterpack
V3i R479 08.B4.34R SE7722AXXW604F download 002C 18.01 MB monsterpack
V3r R4515 08.BD.44R SE6834AXXU1098 download 002E 14.60 MB monsterpack
R4515 08.BD.B3R SE6834AXXU1141 download 002E 11.5 MB monsterpack
V3x R252211LD 85.97.70R USRAZRV3XNRDRXXR25221035 download 002C 22.21 MB monsterpack
V3xx R26111LD 96.A0.0ER USIZRGBLRTRUR2611102A download 0036 20.51 MB monsterpack (sbf)
V6 R26111VL 96.A0.0DR USVOLANSRTRUR26111033 download 0036 23.06 MB monsterpack (sbf)
V8 R601 80.42.39R GSQLIDORTBBN060 download 002D 12.16 MB monsterpack (sbf)
V150 V150 09.09.06R SE6284AXXU1098 download 0011 7.34 MB reflash+flex
V180 R365 0B.D2.2FR SE7548BXXU1113 download 002E 9.15 MB monsterpack
V220 R365 0B.D2.2FR SE8509BXXU1113 download 002E 9.58 MB monsterpack
V300, V500, V600 TRIPLETS 0B.09.72R SE6424AXXT11D4 download 0032 11.34 MB monsterpack
V360 R4513 08.B7.5AR SE6159AXXU10E2 download 002E 14.00 MB monsterpack
V535 R376 0E.66.0ER SE5115AXXU10A7 download 002E 13.89 MB monsterpack
V547 R472 08.18.40R SE7498BXXU10D6 download 002E 13.09 MB monsterpack
V635 R474 08.48.93R GSPFIJICIN02NA0F4 download 002E 16.55 MB monsterpack
V975 R26 83.39.26I SE6070AXXW6023 download 002C 14.29 MB monsterpack
W510 R452G 08.11.05R GSTPEMBARTUA081 download 002E 18.89 MB monsterpack (sbf)
Z3 R452B 08.01.05R GSTCPRIRRTRU0C6 download 002E 18.58 MB monsterpack (sbf)
Z6 R60 80.33.44R GSQACENRTRU055 download 002E 44.98 MB monsterpack (sbf)