Motorola BLUR MB300 Hard Reset - procedures

To Hard Reset the Motorola BLUR MB300 quite differs from other Motorola ANDROID phones.

Do back up all your data stored on your device before doing this procedure, this process will delete all the data on the phone but does not delete the data stored on the microSD memory card.

To hard reset Motorola BLUR MB300
1. Power off phone.
2. Hold camera button and power on phone at the same time.
3. Release the camera button when prompted to.
4. You will see a message screen telling you to press the up or down volume button
5. Press and HOLD the down volume key (ignore message 'Volume Up Key Pressed')
6. When triangle and phone screen appears
7. Press on the screen just above the back key
8. You will now see the "Motorola system recovery" menu
At this point you will have three choices:

1. reboot system now [Menu+Back]
2. apply ssdcrad:update.zip [Alt+S]
3. wipedata/factory reset [Alt+W]
You can simply tap an item to select it.

At the bottom of the screen you can select OK to apply your choice from the menu.

There is also an opportunity to select Hide on the bottom left, I don't know what that does (I tried it and nothing happened).

Selecting Wipe data/factory reset and tapping Ok and the screen changes to a box and a phone (Get it - out of the box) and you see what is happening on the phone.
pick 2
-- Wiping data...
Formatting DATA:...
Formatting CACHE:...
Data Wipe Complete.

Press Menu+Back to reboot

pressing Menu+Back did nothing for me so I tapped 'reboot system now' on the menu and Ok.

The phone restart then will restore back to its factory default state.

Samsung Behold II Hard Reset - restore to factory default settings

Samsung Behold II t939 Android Phone (T-Mobile)If you want to return the Samsung Behold II   to its factory default settings again. Here's, the step by step instructions how to hard reset the Samsung Behold II.


NOTE: All data will be deleted from the Samsung Behold II  as a result of this procedure. However, this process will NOT delete all data stored on the microSD memory card. Please back up all of your personal data first before proceeding.

Try this first:

   1. From the main home screen, tap Quick List
   2. Tap Settings, then Reset settings
   3. Tap Master reset
   4. Enter your password, then tap Yes to confirm

 Or if your phone is frozen and the above doesn't work,

1. Turn the power off. If your Samsung Behold II is frozen, pull the battery out and reinsert it
   2. Hold the Volume Down, Send and End buttons (in that order)
   3. When a graphic appears on the display, press the Menu key to begin the reset

 all data including third-party applications will be deleted from the Samsung Behold II.  The phone will then reboot to its factory default state.

HTC Wildfire Hard Reset - Restore data to factory default setting

If you want to return the HTC wildfire  to its factory default settings again. Here's, the step by step instructions how to hard reset the HTC Wildfire.

NOTE: All data will be deleted from the HTC Wildfire as a result of this procedure. However, this process will NOT delete all data stored on the microSD memory card. Please back up all of your personal data first before proceeding.
HTC Wildfire A3333 GSM Unlocked Smartphone with Android OS, 5MP Camera, Wi-Fi, and Touch Screen--International Version with No US Warranty (Brown)
Hard Reset Instructions:
   1. Turn the Power Off. If your HTC Wildfire is frozen, pull the battery out and reinsert it again
   2. Hold the Volume Down button
   3. Press then release the Power button
   4.  A menu will appear that allows for Fastbook, Recovery, Clear Storage, and Simlock
   5. Just select Clear Storage by pressing the Volume Down button
   6. Press then release the Power button again
   7. Confirm: Volume Up for YES and Volume Down for NO

Now, all data including third-party applications will be deleted from the HTC Wildfire.  The phone will reboot to its factory fresh state once the hard reset process is complete.

Motorola Devour Hard Reset - Restore factory default settings

Body Glove Glove Snap-On Case for Motorola Devour (Black)

 Please back up all data stored on your device before proceeding this process, this will delete all data stored on your Motorola Devour, however, the data stored on the memory card will remain.

Performing  a hard reset on your Motorola Devour only advisable if you’re having consistent problems with it or if you just want to wipe the data out of it to restore the device to its original default state.
1. Turn the phone off. If it won’t turn off, take the battery out then put it back in.
2. Open the physical keyboard.
3. Press and hold the Power + R and Space keys.
4. The recovery screen will appear with a yellow exclamation point. Press Z and M together on the keyboard.
The Devour will then complete the hard reset.

Nokia 5730 Power ON/OFF Switch Line Paths - Check up and Test Spots

The power ON/OFF switch is located at the Flex cable assembly, the positive switching signal is connected down to pin number 9 of the pin connector, then feeds through a tiny chips just located at the top of the PCB board's layout before its feeds to the inner terminal number D9 of the power management IC (power IC)

Unlike most  Nokia handset designed the 5730 Xpressmusic have power ON /OFF interface chips that is being added to it before going it through to the power management IC. This tiny chips is composed of 8 balls terminals and the two terminals is which designated for the power ON/OFF lines.


In my analysis is that the chips is design to switch the status of the device between  charging mode and normal operation mode, I am not so sure of how this designed works, I will try to find out more how this chips works.

5730 Xpressmusic Damage Flex Cable Problems and Failure - Repair Tips

The 5730 flex cable is combined with numeric and navigation keys, music player and volume keys,  the power ON/OFF button switch, this includes the LCD screen display data signal connections, LCD LED back light voltage  and the camera data signals and its power supply voltage. Earpiece audio signals.

If one of this data signals and voltage lines  being cut off , due to a flex internal damaged may result the following failures and problems:
The display may result to white screen (WSOD- white screen of death), garbled, saturated display, a reversing display, blue screen, black screen or empty display due to lack of LED backlights.
Some of Numeric keypads  button keys won't work, or keypad malfunction, music and volume key buttons malfunction.
Unable to power up, due to a cut of the power ON/OFF switch line paths.
The camera won't  work or may result to camera hardware failure.
No earpiece audio sound recieve if the earpiece speaker line is cut.


Those failure above is just a common types of problems may results on a damaged flex cable on Nokia 5730 Xpressmusic. However, not all of those problems may consider and always suspects for a damaged flex because some of those problems might also occurs if  its corresponding components that are connected to those particular circuits possibly might gets damaged also.
like for example, after replacing a new and working cable but the problem still exists, this problem may now lies on the corresponding circuit components to its particular connections.

View here for  more repair hints and guides on keypads failure troubleshooting like the QWERTY keys that are also connected to the Numeric and Navigation keys on the flex ribbon cable of the Nokia 5730 XpressMusic.

Nokia 5730 xpressmusic keypads failure (QWERTY Malfunction) repair manual

This is the Nokia 5730 xpressmusic QWERTY keypads malfunction hardware repair manual.
Each individual keys line paths is being highlighted for quick troubleshooting and check up procedures.
There are two EMI-ESD Filters being used also known as the keypads interface IC, which is located just below the flex cable connector. These two Filter IC's also connected to the NUMERIC keys on flex cable assemblies, including all the switches and button keys.

Here's the connection of each particular keys combined in one particular rows and lines.
Each particular key paths is were connected from the keypad interface IC to each groups of particular ROWs and Column of key buttons connections.

EMI FILTER IC on the right
EMI IC lines / ROW-Columns / Button Keys

A2-A5 - KBR_0 = BACKSPACE , W, E, R , T , Y ,U, I , O

D2-D5 - KBR_1 = A , L , D , F , G, "APOSTROPHE" , "PERIOD" , C , S

B2-B5 - KBR_2 = Z , X ,K ,V , B , N , M , / , CTRL

B1-B4 - KBR_3 = Fn , LShift , "COMMA" , J ,SPACE, RShift, Chr , [ ( FLEX ) 4 , 7 ]

C2-C5 - KBR_4 = Q , ENTER [FLEX- SELECT, VOL UP , VOL DOWN , GAME_KEY1 ,
                                   GAME_KEY2 ] ,

C1-C4 - KBR_5 = @ , [FLEX -1 , 2, 3 , SOFT LEFT, CANCEL , MENU , 8 , 9 ,]

D1-D4 - KBR_6 = H , [FLEX - 0 , 5 , 6 , Soft right , Select , Send , * , #

A1-A4 - KBR_7 = [FLEX- MUSIC_KEY1 , MUSIC_KEY2 , LEFT , RIGHT , UP ,
                               DOWN , MUSIC_KEY3

E1-E4- KBC_0 = [FLEX- 0 , 1, SELECT ] , FN, Z , A , BCKSP

E2-E5 -KBC_1 = [FLEX- MUSIC_KEY1 , 5 , 2 ], Q , LShift , X , L , W

END/power key = POWERKEYX

EMI Filter IC on the left
EMI IC lines  /  ROW-Columns      /         Button Keys

A2-A5 =KBC_2 =  [FLEX- MUSIC_KEY2 , 6 , 3], ENTER , 'COMMA' , K , D , E

A1-A5 =KBC_3 =  [FLEX- LEFT , VOL UP], H , @ , J ,V , F , R

B2-B5 =KBC_4 =  [FLEX -RIGHT , SOFT RIGHT , SOFT , LEFT, VOL DOWN], SPACE , B , G , T

B1-B4 =KBC_5 =  [FLEX -UP , SELECT , CANCEL , SHIFT , N , APOSTROPHE , Y

C2-C5 =KBC_6=   [FLEX- DOWN, SEND , MENU], CHR, M , PERIOD , U

C1-C4 =KBC_7=  [FLEX -MUSIC_KEY3 , * ASTERISK , 8 , GAME_KEY1, 4 ], /, C , I

D2-D5= KBC_8=  [FLEX- # , 9 , GAME_KEY2 , 7 ], CTRL , S , O


 This IC also shares 3 lines for LCD display data signals which is the following:

DISPLAY SIGNALS 
D1 - D4 = TE
E1 - E4   = D/CX
E2 - E5  = RESX

GROUNDS = A3,C3, D3, E3

Just analyze on a particular keys which is not working and trace the line across the PCB layouts. Replace the EMI Filter or the keypads interface IC, this chips are most commonly get damaged due to Electrostatic Discharge and Electromagnetic Interference.
If the numeric, navigation or the key buttons which are connected on the flex cable are not working,  might check or then replace the flex cable as necessarily.

Motorola MILESTONE XT720 - Hard Reset / Factory Data Reset

MILESTONE XT720 - Resetting to factory data fresh default settings.
WARNING: This process will deleted all data stored on your device. However, All data stored on the MicroSD will be affected. Please back first before proceeding.

Motorola Milestone Unlocked Phone Quad Band GSM with 5 MP Camera, MP3, GPS- International Version with No Warranty (Black)To Perform a Reset
  1. Open the Applications Tray. (arrow pointing up located in the middle at the bottom of the display screen)
  2. Select Settings
  3. Select Privacy
  4. Select Factory data reset
  5. Select Reset Phone
  6. Select Erase Everything

To Manually Hard Reset
If there are significant problems with your device or you are not able to follow the steps above please use the following process to manually reset the phone:
  1. Turn off phone
  2. Press Power key + Camera Key to power on the phone and bring up the recovery screen
  3. Press Volume Up + Camera Key to show the recovery menu.
  4. Select Wipe data/factory reset
  5. Select Reboot Phone

Note: Once the phone reboot, all your data and application already deleted on your Motorola MILESTONE XT720, you need to install them back again.

Samsung Smartphones OS Versions (Android / Windows Mobile) and Processors Specification

I just wanted to write a quick list to clear up some speculation on the Samsung OS confusion.
This will be updated and completed soon and can be used as our references dealing with Samsung mobile smartphones firmwares.


Samsung Vibrant - OS Android OS, v2.1 (Eclair)
CPU 1GHz Samsung Hummingbird processor

Samsung i897 Captivate OS Android OS, v2.1 (Eclair)
CPU ARM Cortex A8 1GHz processor

Samsung B7350 Omnia PRO 4 OS Microsoft Windows Mobile 6.5 Professional

Samsung B6520 Omnia PRO 5 OS Microsoft Windows Mobile 6.5 Standard

Samsung S5330 Wave 2 Pro OS Bada OS

Samsung S5250 Wave 2 OS Bada OS

Samsung T669 Gravity T CPU 184 MHz processor

Samsung T479 Gravity CPU 184 MHz processor

Samsung :) Smiley CPU 184 MHz processor

Samsung I5500 Galaxy 5 OS Android OS, v2.1 (Eclair)
CPU 600 MHz processor

Samsung I5800 Galaxy 3 OS Android OS, v2.1 (Eclair)
CPU 667 MHz processor

Samsung M110S Galaxy S OS Android OS, v2.1 (Eclair)
CPU ARM Cortex A8 1GHz processor

Samsung Galaxy A OS Android OS, v2.1 (Eclair)
CPU TI OMAP3440 720MHz processor

Samsung I9000 Galaxy S OS Android OS, v2.1 (Eclair)
CPU ARM Cortex A8 1GHz processor

Samsung I6500U Galaxy OS Android OS, v2.1 (Eclair)
CPU 800 MHz processor

Samsung S8500 Wave OS Bada OS
CPU ARM Cortex A8 1GHz

Samsung I8520 Galaxy Beam OS Android OS, v2.1 (Eclair)
CPU 800 MHz processor

Samsung I5700 Galaxy Spica OS Android OS, v1.5 (Cupcake)/ v2.1 (Eclair)
CPU 800MHz processor

Samsung B7620 Giorgio Armani OS Microsoft Windows Mobile 6.1 Professional,
upgradeable toWindows Mobile 6.5
CPU Samsung S3C6410 800MHz processor
dedicated graphics accelerator


Samsung T939 Behold 2 OS Android OS, v1.5 (Cupcake)

Samsung Vodafone 360 H1 OS LiMo OS
CPU ARM Cortex A8 600 MHz,
PowerVR SGX graphics


Samsung I8000 Omnia II OS Microsoft Windows Mobile 6.1 Professional,
upgradeable to Windows Mobile 6.5/6.5.3
CPU Samsung S3C6410 800MHz processor, dedicated

Samsung Vodafone 360 M1 OS Linux-based LiMo R2.0.1
CPU ARM Cortex A8 600 MHz, PowerVR SGX graphics

Samsung B7330 OmniaPRO OS Microsoft Windows Mobile 6.5 Standard
CPU 528 MHz processor

Samsung B7610 OmniaPRO OS Microsoft Windows Mobile 6.1 Professional,
upgradeable to Windows Mobile 6.5
CPU Samsung S3C6410 800MHz processor,
dedicated graphics accelerator

Samsung B7320 OmniaPRO OS MS Windows Mobile 6.1 Standard,
upgradeable to Windows Mobile 6.5
CPU Qualcomm MSM 7201A 528 MHz processor

Samsung B7300 OmniaLITE OS Microsoft Windows Mobile 6.1 Professional,
upgradeable to Windows Mobile 6.5
CPU Samsung ARM 1176 800MHz processor

Samsung i637 Jack OS Microsoft Windows Mobile 6.1 Standard,
upgradeable to Windows Mobile 6.5
CPU 528 MHz processor

Samsung I7500 Galaxy OS Android OS, v1.5 (Cupcake)
CPU Qualcomm MSM7200A 528 MHz processor

Samsung Propel Pro OS Microsoft Windows Mobile 6.1 Standard
CPU 528 MHz

Samsung i8910 Omnia HD OS Symbian OS v9.4 Series 60 rel. 5
CPU ARM Cortex A8 600 MHz, PowerVR SGX graphics

Samsung C6625 OS Microsoft Windows Mobile 6.1 Standard
CPU 32-bit STMicroelectronics
Nomadik STn8810 393 MHz processor

Samsung i770 Saga OS Microsoft Windows Mobile 6.1 Professional
CPU Qualcomm MSM7500 400 MHz processor

Samsung C6620 OS Microsoft Windows Mobile 6.1 Standard

Samsung i907 Epix OS Microsoft Windows Mobile 6.1 Professional
CPU 624 MHz processor

Samsung i7110 OS Symbian OS v9.3, Series 60 rel. 3.2

Samsung i8510 INNOV8 OS Symbian OS v9.3, Series 60 rel. 3.2
CPU ARM 11 330 MHz processor

Samsung i740 OS Microsoft Windows Mobile 6.1 Professional
CPU 624 MHz processor

Samsung i900 Omnia OS Microsoft Windows Mobile 6.1 Professional
CPU Marvell PXA312 624 MHz processor

Samsung L870 OS Symbian OS v9.3, Series 60 rel. 3.2
CPU 32-bit STMicroelectronics Nomadik STn8815P14 processor

Samsung G810 OS Symbian OS v9.2, Series 60 rel. 3.0
CPU ARM1136 330 MHz processor with TI OMAP 2430

Samsung i200 OS Microsoft Windows Mobile 6.1 Standard

Samsung SPH-i325 Ace OS Microsoft Windows Mobile 6.0 Standard Edition
CPU Qualcomm MSM6500 processor

Samsung i640 OS Microsoft Windows Mobile 6.0 Standard
CPU 32-bit Intel XScale PXA270 416 MHz processor

Samsung i780 OS Microsoft Windows Mobile 6.0 Professional
CPU 32-bit Marvell PXA310 624 MHz processor

Samsung i560 OS Symbian OS 9.1, Series 60 v3.1 UI
CPU TI OMAP 2430 330 MHz processor

Samsung i550 OS Symbian OS 9.2, Series 60 v3.1 UI
CPU TI OMAP 2430 330 MHz processor

Samsung i450 OS Symbian OS 9.2, Series 60 v3.1 UI
CPU TI OMAP 2431 330 MHz processor

Samsung i620 OS Microsoft Windows Mobile 6.0 Standard Edition
CPU TI OMAP 1710 220 MHz processor

Samsung i400 OS Symbian OS 9.2, Series 60 v3.1 UI
CPU TI OMAP 2430 330 MHz processor

Samsung i710 OS Microsoft Windows Mobile 5.0 for PocketPC
CPU Intel XScale ARM 920T PXA27x 416MHz processor

Samsung i520 OS Symbian OS 9.2, Series 60 v3.1 UI
CPU TI OMAP 2430 330 MHz processor

Samsung i600 OS Microsoft Windows Mobile 5.0 Smartphone
CPU TI OMAP 1710 200 MHz processor

Samsung i617 BlackJack II OS Microsoft Windows Mobile 6.0
CPU Dual ARM 9 260 MHz processor

Samsung i607 BlackJack OS Microsoft Windows Mobile 5.0 Smartphone
CPU TI OMAP 1710 200 MHz processor

Samsung i320 OS Microsoft Windows Mobile 5.0 Smartphone
CPU Intel PXA 272 416 MHz processor

Samsung i310 OS Microsoft Windows Mobile 5.0 Smartphone
CPU 32-bit Intel XScale PXA272 416 MHz processor

Samsung Z600 OS Symbian OS, Series 60 UI
CPU TI OMAP 5910 192 MHz processor

Samsung i300x OS Microsoft Windows Mobile 2003 SE Smartphone
CPU Intel XScale 416 MHz processor

Samsung D730 OS Symbian OS, Series 60 UI
CPU TI 192 MHz processor

Samsung i750 OS Microsoft Windows Mobile 2003 SE PocketPC
CPU Intel XScale PXA270 416 MHz processor

Samsung D720 OS Symbian OS 7.0, Series 60 UI
CPU TI 192 MHz processor

Samsung i300 OS     Microsoft Windows Mobile 2003 SE Smartphone
CPU     Intel XScale 416 MHz processor

Samsung D710  OS     Symbian OS v7.0s, Series 60 UI
CPU     TI OMAP 5910 192 MHz processor

Samsung i530  OS Palm OS v5.2
CPU     Intel PXA262 200 MHz processor

Samsung i505       OS     Palm OS v5.2.1
CPU     Motorola MX1 200 MHz processor

Samsung i500 OS     Palm OS v5.2
CPU     Motorola MX1 200 MHz processor

Samsung i250  OS     Microsoft Smartphone 2003
Messaging     SMS, MMS, Email

Samsung i700  OS     Microsoft Windows PocketPC 2003 Phone edition
CPU     Intel PXA250 400 MHz processor

Samsung D700 OS     Symbian OS, Series 60 UI
CPU     32-bit ARM 920T 104 MHz processor

Mobile Phones Problems and Failure with a damaged flex cable

Almost all equipments with LCD displays utilize flat flexible cable to connect the display to the main circuit board.These flat cable ribbon allows extreme space savings and provides the needed flexible cable connection for devices with movable parts such as LCD displays, clamshell phones, slide cellular phones and other gadgets.  Ribbon cable assemblies comes with many  forms and varies according to the mobile phones designs.

Clampshell, Fold, Flip, Slide designs of mobile phones used a flat ribbon cables  to connect the two separated parts of the phone's assembly.
In most designs like the LCD, camera, earpiece speaker, keypads, ON/OFF power switch and other parts are being connected with flat cable connector from the main PCB board.
Each of those components or parts shared each individual lines paths on the ribbon cable assemblies.
Now, if the flex cable is being damaged it will result and varies to the following failures:

If the LCD's line paths is damaged or cut will results
* No LCD Screen Display
* White Screen, some mobile phone users called it white screen of death (WSOD)
*Black Screen, result to LCD's LED back light failure
*Garbled or Distorted Display, Reversed Display

If the ON/OFF power switch line paths is damaged or cut will result to; unable to power up the phone.

If the Camera line paths is damaged or cut, the camera will not work or causes a failure.

And so on if the earpiece line paths is cut off, no audio sound can be recieve or hear,
and also  if the keypads line paths being cut or damaged the keypads won't work or results to keypad malfunction.

In repairing mobile phones  this is very helpful on how to easily determine on how or of which spare parts will come to check first before proceeding to other test and check up methods.
 All you need to do is to determine or identify the mobile phones assembly of components that correspond with the flex cable connections.  In most cases flex cable have highly risk of being easily damaged on clampshell and slide phones.
A damaged Flex cable can be easily determine visually and some others will not, there are flex cables that are shaded and coated with black adhesive.
 

Repair Tips: Make sure to have as much or more replacement flex cable stock on your shop to a certain mobile phones that are mostly used in your areas,  for quick and easy test and  check up procedures. All you need to do is just replace the suspected damaged flex with a good and working or a new one.

Samsung Vibrant Hard Reset and Factory Reset - procedures

Samsung Vibrant Android Phone (T-Mobile)This is the step by step procedure If you want to restore your Samsung Vibrant to its original factory fresh state settings again.

Please Note: Please back up all of the data stored on your Samsung Vibrant. The result of this process will  DELETE all your data installed or stored on your phone.  However, this process will NOT DELETE the data stored on the microSD memory card.

Factory Reset procedure: this can only be done if your phone is not FROZEN.

   1. From the main home screen, select Menu
   2. Select Settings, then Privacy
   3. Select Factory Data Reset
   4. Select Reset Phone
   5. Enter your password, then select Yes to confirm

If factory reset doesn't work or If your phone is FROZEN, Hard Reset will be an option.

Hard Reset Procedure:
   1. Turn the device power off. If your phone is frozen, pull the battery out and reinsert it back
   2. Hold the Volume Down button
   3. Press and then release the Power button
   4. A menu will appear that allows for Fastbook, Recovery, Clear Storage, and Simlock
   5. Just Select Clear Storage by pressing the Volume Down button
   6. Press and release the Power button again
   7. Select one of the option then confirm: Volume Up for YES and Volume Down for NO

 Once the wipe is complete,Your Samsung Vibrant will reboot to its factory default state settings.
All your data including third party applications on your phone already deleted, you need to reinstall it all back again.

Motorola CHARM Hard Reset - procedures

By performing Hard reset this will clear all data on Motorola CHARM and restore its original factory default settings.

Please Note: As a result of this procedures, all your data stored on Motorola Charm will be wipe out. We highly advise to please back up first before proceeding. However, this process does not delete all data stored on microSD memory card.
Car and Home 2 in 1 Combo Charger for the Motorola CHARM - uses Gomadic TipExchange Technology
Hard Reset Procedure:
1. Turn the power off. If your Motorola CHARM is frozen, pull the battery out
and reinsert it again.
2. Press and hold the Power and Camera buttons
3. Release the Camera button when prompted
4. Press and hold the Volume Down key
5. A yellow exclamation will show and or appear on the display
6. Then, select the Wipe data/factory reset (Alt + W) option

All data including third-party applications will be deleted if YES is selected , from the Motorola CHARM.
wait for the phone to reboot.
Once all done the device is now return to its factory settings or default state.

Samsung Epic 4G ( Sprint ) Hard Reset - Procedures

Doing hard reset is only advisable if the device experiencing application problem like freezing or hang etc. This process will restore the device to its original default state.
 PLEASE NOTE: The result of this process will delete all data stored from your Samsung Epic 4G. However, this process does NOT delete data stored on the microSD memory card. We advise to back up all of your personal data before you continue.


Hard Reset Procedure:
  1. Turn the power off. If your Samsung Epic 4G is frozen, pull the battery out and reinsert it
   2. Hold the Volume Down button
   3. Press and release the Power button
   4. A menu will show that allows for Fastbook, Recovery, Clear Storage, and Simlock
   5. Then, Select Clear Storage by pressing the Volume Down button
   6. Press and release the Power button
   7. Confirm: Volume Up for YES and Volume Down for NO

If  you select YES , all data including third-party applications will be wipe out from the Samsung Epic 4G. If  the wipe is complete, wait 'till the phone will reboot to its factory fresh state.

Nokia N82, N85, N86 8MP, N95, N96, E71, E72 Hard Reset - Procedures

This Soft and Hard  Reset procedures will also works on Nokia N82, N85, N86 8MP, N95, N96, E71, E72 and more Nokia S60 3rd Edition mobile phones.

Please Note: The result of this process will wipes the entire phone memory and settings fresh to how it was (or should be) when you bought it.You are advise to make a back up of your device and you need to understand that what you are doing this is at your own risk. However, this does not delete all the data stored on the memory card.
For Soft Reset;
- back to factory settings: This should maintain your data (contacts/messages/calendar/notes etc), just returning your N97 back to all previous settings
From menu:
Settings> Phone>Phone Management>Factory Settings

Restore Factory Settings
Dial *7780# to restore all the settings to default. It will request for security PIN, the default code will be 12345.

Reformat Phone System
Dial *7370# to reset Nokia device, only data in System will be affected. To play safe, back up all your data before proceed. It will request for security PIN, the default code will be 12345.


For Hard Reset:
This also restore your Nokia when it frezzes at the nokia screen logo only and didn't go any further.
hard reset is an options but will result to loosing all settings, contacts, data etc…

Turn your phone off and simultaneously press these four buttons circled in red.
  • * (asterisk key)
  • 3 (numeric 3 key)
  • CALL / GREEN key
  • On button
 Wait for the handshake/Nokia logo appears.
Once the process is complete, re-install all the back up application on the device.

Nokia X6, 5800 XpressMusic Hard Reset - Instruction / procedure

Here's the procedure on how to Soft reset and hard reset your X6, 5800 XpressMusic smartphone devices.

Please Note: The result of this process will wipes the entire phone memory and settings fresh to how it was (or should be) when you bought it.You are advise to make a back up of your device and you need to understand that what you are doing this is at your own risk. We will not be held liable for any type of loss that may occur during the reset process.

For Soft Reset;
- back to factory settings: This should maintain your data (contacts/messages/calendar/notes etc), just returning your Nokia X6, 5800 XpressMusic back to all previous settings
From menu:
Settings>Phone>>Phone Management>>>Factory Settings

For Hard Reset;
-Turn the Phone Off
-Press and Hold ANSWER + REJECT + CAMERA keys simultaneously.
- Turn ON the phone by pressing the Power Button
- Wait for the handshake / Nokia logo appears.


Once clear all your data stored is already wipe out, reinstalling it is the next option.

Nokia N97, N97 mini Soft / Hard Reset - Instruction Guides

Here's the Instruction Guide on How to soft / hard reset Nokia N97 smartphones. This Procedures also works on S60 5th editon versions like the Nokia N97 mini.

Please Note: The result of this process will wipes the entire phone memory and settings fresh to how it was (or should be) when you bought it.You are advise to make a back up of your device and you need to understand that what you are doing this is at your own risk. We will not be held liable for any type of loss that may occur during the reset process.

For Soft Reset;
- back to factory settings: This should maintain your data (contacts/messages/calendar/notes etc), just returning your N97 back to all previous settings
From menu:
Settings> Phone>Phone Management>Factory Settings

Restore Factory Settings
Dial *7780# to restore all the settings to default. It will request for security PIN, the default code will be 12345.
 
Reformat Phone System
Dial *7370# to reset Nokia device, only data in System will be affected. To play safe, back up all your data before proceed. It will request for security PIN, the default code will be 12345.

For Hard Reset:
This also restore your Nokia when it frezzes at the nokia screen logo only and didnt go any further.
hard reset is an options but will result to loosing all settings, contacts, data etc…

Turn your phone off and simultaneously press these four buttons circled in red.
  • Caps shift
  • Space bar
  • Delete button
  • On button
 Wait for the handshake/Nokia logo appears.

You’ll know if it’s worked when you see the initial set up screen, asking country of origin.

Samsung M110S Galaxy S Hard Reset - Procedures

Note:  Please back up all of your personal data before you proceed. All data will be deleted on your Samsung M110S Galaxy S by doing this procedure. However, this process will NOT delete data stored on the microSD memory card.
To Hard Reset Samsung M110S Galaxy S
  1. Turn the power off. If your Samsung Galaxy S is frozen, pull the battery out and reinsert it
   2. Hold the Volume Down button
   3. Press and release the Power button
   4. You are now presented with a menu that allows for Fastbook, Recovery, Clear Storage, and Simlock
   5. Select Clear Storage by pressing the Volume Down button
   6. Press and release the Power button
   7. Now simply confirm your decision: Volume Up for YES and Volume Down for NO

If the above procedures doesn't work, use this second method below,
1. Shut Down the Samsung M110S Galaxy S
2. Now press the Volume up, Home and Power button together.
3. When Samsung Symbol shows up release the power.
4. Then there is a boot Menu. Use the volume up/down to choose and home to select.

All data including third-party applications will be deleted from the Samsung M110S Galaxy S, If you selected YES, .
Once the wipe is complete, the phone will reboot to its factory defualt state.

Samsung Intercept Hard Reset - Procedures

Note: Back up all your personal data on the Samsung Intercept, it will all be deleted in this process. However this process does not delete all data stored on the micro SD memory card.
If done so, you may proceed the following procedures:

Samsung Intercept Android Phone, Grey Steel (Sprint) 

   1. Turn the power off. If your Samsung Intercept is frozen, pull the battery out and reinsert it
   2. Hold the Volume Down button
   3. Press and release the Power button
   4. You are now presented with a menu that allows for Fastbook, Recovery, Clear Storage, and Simlock
   5. Select Clear Storage by pressing the Volume Down button
   6. Press and release the Power button
   7. Now simply confirm your decision: Volume Up for YES and Volume Down for NO

All data including third-party applications will be deleted from the Samsung Intercept, If you selected YES, .
Once the wipe is complete, the phone will reboot to its factory default state.

SE Xperia X1 Touch Screen Not Responding in Landscape Mode - Repair Solution

Sony Ericsson XPERIA X1 Unlocked Phone with 3G, 3.2 MP Camera, Wi-Fi, GPS, Bluetooth, and MicroSD Slot--U.S. Version with Warranty (Silver)This common problems on Sony Ericsson Xperia X1 like, touchscreen just stops responding once slide out the keyboard, ended up black screen when slide out or open, the phone sometimes has no image at all when the phone opened and can only work in portrait mode.
(If you are a standard user by this product you can check the warranty period of your Xperia X1, if not yet expired you can send it to the SE service centers for repair.)


This all problems exists when the flat flexible cable wire on Xperia X1 is being damaged already.
At first of my encounter with this, I have tried to hard reset the device and tried different ROMs but the problem still persists. So the only solution for this, is to replace the ribbon cable wire to fix the problem.


Mostly most of my repair history on Xperia X1 got this common problem from many standard users. Xperia X1 was released last 2008, October if I'm not mistaken, but almost got over hundreds of it I got repaired with same problem issues.

Here's the disassembly guides for SE Xperia X1 from  trusted sites:
Ifixit
formymobile


Anyway, you can purchased a replacement Flat Flexible cable or ribbon on ebay. Do not even try to buy an imitation one, or you might experience more backjob from your costumers, that outta possibly happen.

"this cell phone repair tutorials post is an answers to all who are asking solution about this problem via my e-mail"

nokia x2 camera hardware failure repair guide

Here's another mobile phone repair guide to fix Nokia X2 camera hardware failure problem issues. Camera hardware failure may only happens if the device is accidentally heavily drop, damaged by a liquid or wet damaged and other any accidental causes.
This cellphone repair tutorial only covers if the camera module has been already replaced or properly checked and tested but the problem still unsolved.

This repair guide covers the line paths and components connected within the camera circuit. Some mobile phone technicians called this the "camera ways" which  means the camera connector's tracing line path guide.
Here's the picture repair guide, just follow the tracing and testing spots indicated on the repair guide picture below,

Repair hints: Check first the two voltage supplied line paths before tracing the other lines.  The supply voltage line is at pin 2 and pin 10 on camera module connector. Each voltage line have filter coils on it, this coils may first suffer the damaged especially on wet damaged handsets. The voltage amount is labeled on on the picture which is the VCAM (camera voltage) 1.8 and 2.8 volts DC (direct current) that being feeds from the power management IC.

Nokia X2 END, ON/OFF Power Key Line Path Ways

Here's the repair guide to trace on Nokia X2 ON /OFF power key and END call key line paths.
If this line paths cut or open due to water damaged the device will not unable to power on.
On Nokia X2 there are two components that will be able to test
if problems occurs, which is the resistor valued 100ohms and a thermal resistor just mounted at the back of the PCB board, just behind near the END/Power key.


Do check and replace those two components if found faulty or damage. If this guide does not solve the problem, there is a possibility that the cut or open lies beneath to inner side of the PCB down to the power management IC.
Extra care and need more expertise to handle on major components such as the larger chips if working on it.

Nokia X2 Earpiece Line Paths on PCB

Here's the Earpiece speaker PCB line ways connection for easy troubleshooting and tracing the line paths on Nokia X2 Earpiece failure problem isseus.Check the earpiece speaker first before proceeding this repair guide tutorial.
The Nokia X2 used the rectangular type earpiece speaker which has very high quality audible sound output.
You can find and replace this type of speaker on other Nokia's latest mobile phone or smartphone released.

From the earpiece speaker PCB terminal connector pads, both negative and positive polarity line connections feeds through the filter coils just located near right below on it. Then the line paths goes deep down the PCB to the JUNO IC's pin Y12 and W12.

Nokia X2 IHF ( EARPIECE ) Speaker Repair Solution

Here' the repair guide solution to fix Nokia X2 IHF earpiece speaker failure. Just make sure that the earpiece speaker is good and 100% working before proceeding on this cell phone repair tutorial guides below.
So check the IHF( integrated hands free) speaker first before continuing.

If you done so, here's the picture repair guide on X2 earpiece speaker problem solution.
There are two IHF speaker is being connected to X2, the left and the right speaker channel.
I have in-lined the audio signal ways or lines paths and highlighted each connecting components for easy troubleshooting  procedure.
Just refer to the picture guide to find which part are faulty. If the left channel speaker is only got the problem then concentrate to the left channel only, then if the right channel got the problem concentrate to it as well also.
If both are faulty., then check both line paths and components.
I also included in this guide the IHF Audio Amplifier chips ball bumps (terminals) pattern  for a much deeper understanding how the said IC works. The Audio amplifier IC on  X2's circuit  were both same.
Remember this mobile phone repair repair tutorial is absolutely 100%  free..

Nokia X2 NOT Charging Problem Complete Repair Instruction Guide

Here's a complete step by step repair tutorial on how to fix Nokia X2 Not Charging problem issues. This repair guide will show you on how to trace the charging line paths in every components on Nokia X2 PCB board for easy troubleshooting procedure. The red line indicates on the repair picture  guide below is the charging voltage ways or line paths. The components highlighted in pink square are the components that are connected to the charging circuit. You can trace each components as well as the charging line paths, jus start from the charger plug-in connector terminal pads then down to the inner parts that indicated on the picture.

Start checking the fuse if is busted or open, then the diodes and the two filter capacitors, next to the coil and other capacitor in there, then trough to the whole or entire charging circuit connected components.

Iphone Diff SIM detected connect to itunes after unlock: solution

For those iphones who have problem after jailbreak and unlock need to activate for each sim, this solution may help.
Steps:
1-All you need to remove the previous activation, for that you need to follow the below procedures.

2.1- Install OpenSSH in you iphone using Cydia (search for OpenSSH)
2.2 Install WinSCP for Windows (WinSCP :: Download)

3. Use WinSCP to connect to iPhone
Windows Guide To Using WinSCP With iPhone


4. Follow the below steps:

4.1 Download patched lockdownd file from here
RapidShare: Easy Filehosting

4.2 Navigate to to /private/var/root/Library/ and copy lockdown folder to your desktop (for backup just in case - this you need to do)


4.3 Delete that folder from phone

4.4 Unzip downloaded patched file and upload to phone to replace the folder you just deleted


4.5 Naviagte into patched folder and make sure file pemissions are set to 644 for all files (follow the procedure in Step 3 above)

4.6 Reboot phone.With any sim..(As fone is already unlocked)

DOWNLOAD LOCKDOWN ZIP

Nokia X2 LCD LED Backlight and Keypad LED Repair Solution

Damaged or faulty LCD LED backlight may result to a black screen display.
Here's  mobile phone repair guide on how to fix Nokia X2  LCD LED Backlight and Keypad LED failure.
Just follow the steps on the repair guide picture shown below and trace each corresponding component connections and line paths.
The LED backlights is driven by an 8 bumps LED driver IC (shown on the picture above). Some line paths are easy to trace and check, this is very helpful when it come to mobile repair especially if a water damaged one, some open line paths may possibly happen.

Nokia X2 Mouthpiece ( microphone ) Failure - Repair Solution

Here's how to fix Nokia X2 microphone, mouthpiece failure or problem issues, this is a repair hints or solutions to solve a faulty mouthpiece or microphone. This kind  of problem lies on the phone's microphone like when the other person you're calling can't hear your voice.

Now, this mobile phone repair guide may only useful if after checking up  or replacing microphone (mouthpiece)  on Nokia X2 but the problem still remain, no voice audio can be heard.
The repair guide solution below show, the component or parts where the mouthpiece (mic) audio data feeds through the inner parts of the circuit on Nokia X2 PCB board layouts. As mobile phone technicians called it a MIC ways or MIC line paths.


Here's the values of each components for easy test and check up procedures,

You may check and replace those particular SMD components indicated on the repair guide picture above if found faulty or damaged.

Nokia X2 Charger Not Supported Repair Instruction Procedure

Here's how to repair the Charger Not Supported failure issues on Nokia X2 cell phones.
This cell phone repair guide shows the faulty component or parts that causes  or result to charger not supported that indicates on the LCD displays when by doing to charge the Nokia X2.

In Nokia X2 there are three 47Kiloohms Btemp thermistors that are being connected to the BSI (battery size indicator) circuit. You can then check them or replace one by one or at the same time for a quick repair solution method. I will try to monitor this solution on Nokia X2, and update if this post to let us know which among those three Btemp  thermistor may first get damage then causes the problem.

Nokia X2 Keypad Failure, Malfunction - Repair Solution Guide

Here's a complete cell phone repair tutorial on how to diagnose, repair the Nokia X2 keypad failure, malfunction problem issues, this repair solution guide covers each on every keypad's keys line paths ways for easy troubleshooting keypad failures. I preferred this kind of  repair picture guide, so that the beginners can catch up also with this kind of mobile phone repair solution method.
As keypads went wrong or stop malfunctioning by way of wet damaged or any accidental behavior, this solution may also help to solve the problem.

In Nokia X2 the keypad circuit uses an EMI filter to protect the application processor and other components from electromagnetic interference and Electrostatic discharge.
The said IC chips is more prone to be damaged first if the EMI and ESD occurs, for this IC works like fuse, it cuts out the high voltage or current before going through the inner and the very important component parts.
This is also what happen if the keypad circuit is  been exposed or accidentally the EMI -ESD occurs in a blink of an eye.

The repair picture guide below is the layout of the components and parts of which where the keypad line paths data is being connected and distributed  to each keypad keys. Those line paths and components part that are being highlighted is where the repair procedure may goes through or begin with.

I have line up each Keypads Rows and Columns for an easy tracking and tracing, if something wrong with that particular key. So just try to trace each paths for your troubleshooting procedures.

Nokia X2 LCD Screen Display Failure - Repair Solution

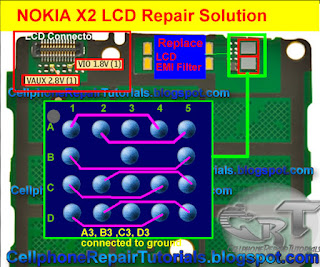
Here's how to repair the Nokia X2 LCD screen display failure problem. This cell phone repair tutorial may help if the screen display is blank, white screen, garbled or you already change the LCD  panel but the problem still exists. The picture guide repair solution below shows the component parts where the LCD data signal feeds from the mobile phone application processor to the LCD circuit.
It uses two EMI Filter chips (crystal IC) to protect the circuit from risk of electromagnetic interference and electrostatic discharge. The two chips have similar internal circuit designed with each other.
By replacing  one of them either the upper or lower EMI Filter chip or both, preferably may solve the problem. You can also check the EMI filter IC with a guide I included on the picture, it has seven input an output line paths.
Do also  check the LCD supply voltage, It needs two supply voltage to make it work, the two highlighted components near the LCD connector are the value of each voltages, if this  two voltages may not present may also result to display problem issues.

Nokia X2 Insert Sim Card Solution - Complete Hardware Repair Procedure

Here's a complete step by step cell phone repair tutorial on how to fix Nokia X2 mobile phone insert sim card problem or hardware failure issues. Before proceeding this process make sure to completely check the Sim card connector pins connections, make sure if it is free out from dust, molds, corrosion or any foreign objects.

The picture guide below shows the components ( highlighted square pink color ) where the line paths of the sim card connector goes through. You can check on each value or replace them if found  faulty.
Now, the  X2 uses the EMI Filter to protect from  risk of EMI and ESD interference.

Here's the full path of each components on how to test and diagnose the Insert SIM card failure on Nokia X2. The EMI filter  input and output line paths can be check like the repair guide picture below.
Before replacing or removing the EMI Filter make sure to check first the power supply voltage that feeds to the SIM connector Pin 1. Check the line paths in between those lines from C2215 to R2311 and to sim card connector pin 1.

If the line paths is okay, you may now then proceed to replace the EMI Filter IC. If this solution may not solve the problem, you may send me a message on a shout box page on this blog.